Archive by Author

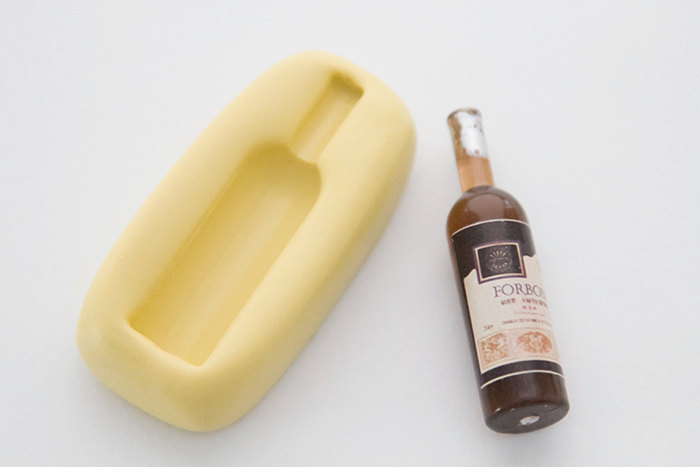
Wine Bottle Mold For Cupcakes

Wine Cupcakes

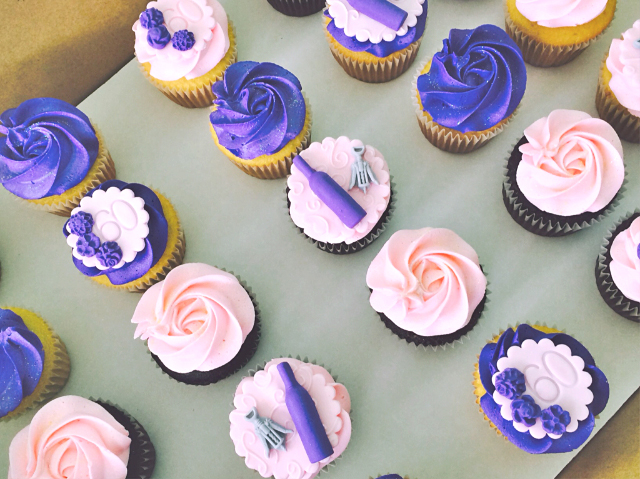
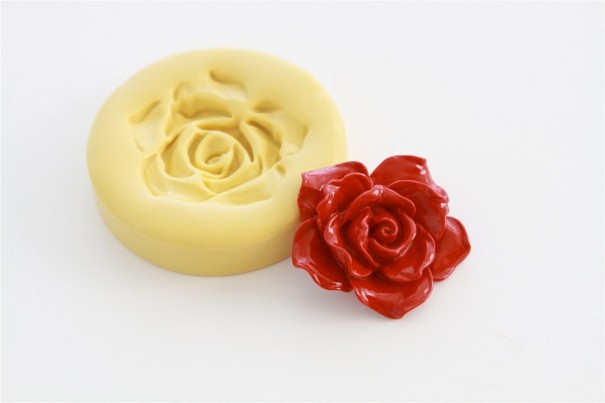
How awesome are these wine inspired birthday cupcakes one of my customers made!? Brittany Vaughan created these beauties for a rememberable 60th birthday party. The theme was inspired by wine and is undeniably a party for a girly gal with pink and purple cupcakes flecked with flowers. If you would like to get the same look for your cupcakes, here are the molds you will need to purchase…..
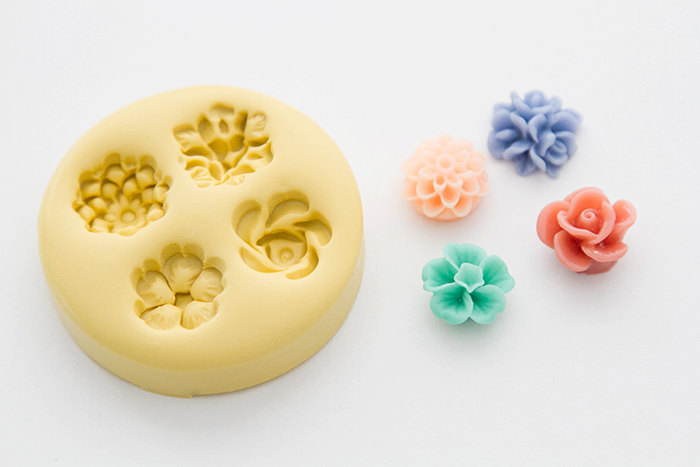
Wine Bottle Mold

Mum, Rose and Hibiscus Mold

Using Your Molds
After you have received your wine bottle mold and flowers mold, wash them in hot, soapy water and dry them with a lint free towel. When your molds are thoroughly dry, lightly dust the inside of the cavities with powered sugar or cornstarch. This step will make it easier to release your fondant or gumpaste. Next, take a small piece of your colored fondant or gum paste and push it into the cavities of your molds. For the best results, remove any excess around the edges and make sure the backs are flat. Now you can flip the mold upside down and gently push/wiggle your edible wine bottles and flowers out onto a parchment paper lined cookie sheet. Set out to dry or use immediately for cupcake decorating.

You could also use the wine bottle mold with candy melts or (for the more daring) tempered chocolate. You can top cupcakes, decorate cakes or make wine bottle chocolate candies as favors. Also, if you wanted to add more detail onto the wine bottles, you can use edible markers to draw on a personalized label. Or, if you have access to an edible printer, you can design a label using Photoshop or a program similar to make printed edible paper labels.

The wine inspired party isn’t just fabulous for a milestone birthday, it would make the perfect theme for a bachelorette party or bridal shower! The uses for these molds are limitless and my customer Brittany has shown us a great way to be creative with them.

Happy Making!

How to Make Dragonfly Cupcake Toppers

Dragonfly Mold

These are definitely my favorite cupcake toppers I have ever designed, there is something so enchanting about them.

A few years ago, I was asked to make cupcake toppers for a baby shower that went with a feminine, nature inspired theme. I quickly went to the drawing board and planned out this whimsical dragonfly design. I love the soft color palette of pink and ivory with a touch of gold against the texture of the wood grained background. It is so dreamy!

I used this mold to create the dragonfly on the toppers.

Dragonfly Silicone Mold

If you want to make the edible dragonflies to decorate cupcakes or cake with, here’s what to do….

Making Edible Dragonflies

First, purchase the dragonfly mold here! Once you have your mold, color a bit of your favorite fondant or homemade gumpaste with a pale pink gel color, I like using Americolor soft pink, but any brand will do! Lightly dust the inside of your mold cavity with either cornstarch or powered sugar, I use a 50/50 mixture of both. Next, place a small piece of your pink fondant into the mold and push it down into all of the nooks + crannies. Remove the excess fondant from the mold so you will have a nice crisp edge to your dragonfly. Gently bend the flexible mold and push the dragonfly out onto a parchment lined cookie sheet. Once you’ve made enough of them, set them out to dry completely for at least a few days. Now you’re ready to add a touch of edible gold! Make a slurry out of vodka or lemon extract combined with gold luster dust. Use a small paint brush (used for food purposes only) and paint the liquid gold onto the body of the dragonfly.

Now you are ready to attach your edible fondant dragonflies onto any background you’d like. If you want to get the complete look of my dragonfly cupcake toppers, use a wood grain texture mat onto rolled out fondant and cut out small disks from it to use as your backgrounds. “Glue” your fondant dragonflies onto the edible disks by using simple syrup or royal icing.

These whimsical dragonfly cupcake toppers are simple to create and make any cake or cupcake look like they came out of a classic fairy tale book.

Victorian Cameo Cookies Using Silicone Molds

Cameo Cookies

It’s almost time for Easter and I wanted to share a set of Victorian Egg Cookies I designed using silicone molds from the shop. Here are the molds you will need to get started…..


Cameo Frame Mold

Tropical Flower Cameo Mold

Victorian Cameo Mold

Step 1
Bake off shortbread or sugar cookies until lightly golden. Make a small batch of simple syrup while cookies are baking.

Step 2
Color your fondant. Roll it out into sheets 1/8″ thin. Cut out egg shapes using your egg cookie cutter.

Step 3
Brush cooled cookies with your cooled off simple syrup. Place fondant egg shapes on top of moistened cookies.

Step 4
Dust molds with cornstarch. Place enough fondant inside the mold cavities to fill all of the nooks + crannies. Push the fondant shapes out onto a parchment lined cookie sheet to dry.

Step 5
Paint your frames with a mixture of gold luster dust and vodka (or lemon extract). Paint cameo details with dry luster dust colors to get a softer look.

Step 6
Adhere your finished frames and cameos onto your cookies using simple syrup or royal icing. Pipe a royal icing bead border along the edge of your cookies.

Voila! You have stunning Victorian Egg Cameo Cookies.

You will turn heads if you show up to a party with these little works of edible art! Not only are these cookies a great gift to bring to Easter dinner on Sunday, they would also make incredible wedding favors. I have made a lot of these cookies through my company, BB Sweets, for wedding and bridal shower favors.

You can be creative and change the look of your cookies by using a variety of cameo molds we feature in the shop. For instance, you could make nautical themed cameo cookies using this cameo and keep the color scheme white, navy and gold. You could also make Christmas cameo cookies using any of the holiday cameos we have listed in the shop. The ideas are limitless!

If you’re not into baking, another great idea to utilize the same cameo molds , would be to use with PMC or resin. You can make stunning, one of a kind cameo jewelry to wear on a necklace or wear as a brooch to freshen up a simple cardigan sweater.

Be creative, and most importantly, have fun!

Minnie Mouse Cookies Using Our Bow Silicone Mold

bow-silicone-mold

I made these adorable Minnie Mouse cookies for my sweet niece’s 2nd birthday party favors, they were such a huge hit! I used this bow mold from the shop to create the fondant bows. You could use the same mold with candy melts or tempered chocolate to decorate Minnie Mouse cake pops, it would be the perfect size for them!

bows-2

Let’s Start with the Cookie
Roll out your favorite shortbread or sugar cookie dough to about a 1/4″ thick and cut out circles using a 3″ cookie cutter. Line your cookie sheets with a Sil Pat or parchment paper to prevent sticking, and place your cookie rounds on top. Bake until they’re lightly golden along the edges.

While your cookies are out of the oven and cooling, make a small batch of simple syrup. Boil white sugar with a little water just until the sugar dissolves, immediatly take off the burner and let it cool. Next you will want to color a ball of your favorite fondant, these are a pale pink, but feel free to change it up if it will match your decor better. I rolled my fondant out pretty thin, about 1/8″ and then used a textured mat to give it the basket weave pattern you see. After you texture, use your washed, 3″ circle cookie cutter to cut out fondant circles.

Next, take a pastry brush and dip it into your simple syrup then brush on to the tops of your cookie rounds. Place your textured, fondant circles on top of the lightly moistened cookies. Now that you have your base/backgrounds of your cookies done, you can now work on the Minnie Mouse silhouettes.

Making Minnie Mouse
To make the Minnie Mouse silhouette, you will need black fondant. Roll it out thin, about an 1/8″. I used two different sized small, round cookie cutters to cut out Minnie’s head and ears. Use the larger one for Minnie’s head and the smaller for the ears. I used the cookie cutter to notch out a little of the ear circles so it would fit against the curve of the head nicely. Dip a small paintbrush (only used for edible use) into the simple syrup and lightly brush the backs, then place on top of the cookies to create your Minnie silhouette. Now all she needs is a bow!

Making the Fondant Bows
To make your fondant bows, lightly dust the inside of the mold with corn starch. Take a small piece of red fondant (or any color you fancy), and push it into the mold cavities. Gently flex the mold to remove your bows. “Glue” the bows on with your simple syrup and that’s it, you have made my version of Minnie Mouse cookies!

Using A Rose Silicone Mold with Fondant

Rose Mold Cookies

A couple of years ago, I was asked to design cookies for a shabby chic dessert table. I used this mold to create the edible roses. Here’s how I did it….

Creating Edible Roses
First, color a small piece of your favorite fondant (I used Satin Ice) with an edible gel color (I used Americolor Peach). Then lightly dust the rose mold with corn starch or powdered sugar (I use a mixture of both). Push a piece of your colored fondant into the mold making sure it gets into all of the nooks + crannies. Flatten and remove the excess fondant around the edges. Gently push the fondant rose from the mold. Let the roses dry completely before painting the outer edges with a mixture of vodka or lemon extract and gold luster dust. Once the roses are dried and painted, glue the completed fondant roses onto your cookies with royal icing. You could also make these gorgeous roses to place on top of cupcakes or decorate wedding cakes with.

large-rose

Go be creative and try using any of the larger flower molds we feature in the shop to make edible flowers with.

NO NEW ORDERS WILL BE ACCEPTED - ON VACATION UNTIL FURTHER NOTICE